


No brass band was waiting to greet Jim Bowie on that warm summer day in 1826 when he returned home to Rapides Parish, Louisiana after a long trip up North. Instead, much bad news awaited; in his long absence, slanderous rumors had been spread about him by Major Norris Wright, a rich outsider from Maryland who had worked his way into becoming the local sheriff and a bank president. Bowie already disliked Wright and immediately went to find him. Without even stopping to get a gun, he went to Bailey’s Hotel, where Wright was playing cards, and confronted him. Wanting to take no chances with Bowie, Wright drew a pistol and Bowie grabbed for a chair. Wright fired, but only grazed Bowie (a later account says the bullet hit a silver dollar - or a Masonic medallion – that was in Bowie’s vest pocket). Bowie knocked him to the floor, where he pinned Wright with his knees and went for the only weapon he had – a folding pocketknife.
This was the point where things really went sour for Jim (as if being shot wasn’t bad enough). Though he was able to get his knife out, in the struggle he was unable to get it open. He bit at the blade with his teeth, trying in desperation to open it while grappling with Wright. In frustration, he was forced to throw the knife away and just pummel Wright as people tried to pull them apart. He bit onto Wright’s hand so hard he lost a tooth in the process before they were separated by friends of both parties. Onlookers reported that if it hadn’t been broken up, Bowie would have certainly killed Wright with his bare hands. It was as a result of this fight that Bowie would take up wearing a fixed blade knife at all times - and it was with this new knife that he would kill Wright only a year later at the Sandbar fight, after first being shot and stabbed by Wright several times!
How history might have changed if Bowie had been able to open his knife with one hand, the first time around!
Today, we are fortunate to have pocketknives that both open easily and lock securely. Most folders even have some kind of hole in the blade or thumb stud to allow for a one handed opening. If Bowie had owned such a knife, surely Wright would have died in the hotel bar that very day, and never have been able to deliver the terrible chest wound to Bowie at the Sandbar; a wound from which he never fully recovered. Let us learn from this account, and make sure that if we can get a knife out in a fight, that we can use it to take care of business.
For general utility any opening method is fine, and in fact for civilian utility use I recommend the old fashioned two-handed method. One hand grasps the handle, the other the blade, and you simply open the knife. Safe, controlled, and it doesn’t scare the bejeezus out of your coworkers when they ask if anyone has a knife and suddenly one appears "SNAP" in you hands. Remember, if you carry a knife “because you use it at work, officer” then you would never want to have a coworker say (under oath, to the authorities) “yeah, it was creepy the way he’d just snap that knife out”. Besides, your mom wouldn’t approve.
Quick draws aren’t for showing off or some testosterone driven thing (though yes, they are “cool as hell” action-movie kind of stuff). They are specialized close combat openings, each for a specific purpose. Here we will examine drawing protocol, several methods of opening the knife, and support drills to help you integrate this with your preexisting fighting skills. Remember that although the quick-draw is an important module in the knife fighter’s overall education, it is certainly more important to know how to use the knife once it is out. Practice these skills and use them in scenarios, but don’t dwell on them – they are just means to an end. You will actually draw and open faster if you concentrate on the follow up action, and not the opening alone.
Quick draw is also not a substitute for awareness. A prudent fighter looks to the future and has the knife in hand already, precluding the need for a quick draw. Body positioning and angle can allow for an invisible draw, as can physical cover (such as a jacket over your arm or a table cloth). Awareness is also a key to beating the quick draw. Learn two counters for every technique!
The Training Knife
Before I get to the specifics of training, I’d like to point out that for this kind of work, your ability to drill safely and realistically will be directly related to your equipment and the quality of your training partners. The only decent “folding knife simulator” is just that – a folding knife that has been dulled on a grinder and sanded so smooth you can run it across your face. Look through cutlery catalogs, online wholesalers, and at knife shows for “cheap knockoffs” of your favorite knife to grind down. I only wish that one of the “big names” of the knife world would make a line of trainers to match their carry knives! A lot of companies talk about being there for the “tactical” market, but with the sole exception of a few custom makers, no one does trainers to match. A pity indeed!
Even without an edge and with the point rounded, the training folder is still quite dangerous. Being stabbed with it would be like being stabbed with a wide bladed screwdriver – potentially deadly. This is not a sparring weapon; it is a training tool. The edge is only a few millimeters wide, at best maybe 1/8”. Wear a fencing mask and carefully control the thrusts, particularly when in the reverse grip, because even a dull knife can still puncture or weaken the mask. Work at slower speeds with your partner in drills and at faster speed against targets or in the air solo.
Needless to say, doing any of these drills with live blades is just tempting fate. They aren’t something just to run out and do because you read it in a magazine. Do them to get the feel of the knife, and as a draw, open, and cut against hanging rope or whatever test medium you like, just be conscious that you have a live blade. Have a friend around in case you cut yourself, just like having a spotter when you lift weights. Though I’ve never been stung badly, I’ve heard horror stories from folks who had to drive a stick-shift to the emergency room one handed after a high speed slip up. The knife can bite a piece out of you in a flash, so “make a path for the blade or it will make its own”, as they say in Bando! Another reason I don’t do this much anymore with my good, sharp knives, and use trainers most of the time, is that I just don’t like to snap the hell out my carry knives. In doing this training, you will be opening the knife literally hundreds of times an hour. Do you really want to do that to a good blade? Make a trainer to abuse and save the razor sharp carry knife for when you go “out on the town”.
Quick Draw Breakdown
The specifics of the draw will be determined by how you carry the knife. The general process for a smooth, efficient draw is to:
1) Clear any clothing obstructing the draw
2) Stabilize the knife with either hand
3) Secure the grip on the knife with the web of the drawing hand and
then fingers
4) Draw the knife clear while still retaining it close to your
body
5) Open with any appropriate method, dependent on grip
6) Employ as appropriate, dependent on situation
This sounds like a long list, but it is really just the common sense steps that should be learned slowly and practiced efficiently until you waste no motion or time in drawing. As you draw, it is natural to crouch slightly, and this can be further used to deny access to the knife as it is drawn, thus making the opponent’s counter less likely. Part of your training in understanding the quick draw is also understanding how to counter the quick draw. Learn how to defeat it and you will make your own “draw to strike” even better by knowing what not to do, and counters to all the common defenses.
Clear any clothing and stabilize the knife
This first step is only necessary if the knife is concealed by a loose shirt, a long jacket, or some other item of clothing. You want to be able to pull the clothing away from the knife with either hand. Train both sides and find their good and bad points against different attacks. The second step, stabilizing the knife, makes securing your grip on the knife easier by locating isolating it so it doesn’t move in any way except to draw. If you are wearing clothing that stretches or is baggy (like sweats or fatigues) this becomes more of an issue. Stabilizing the knife can make the difference between drawing the knife smoothly and just tugging at it. Again, you want to train stabilizing the knife with either hand and seeing how this affects your ability to follow up and counter.
In practice with a folder, the stabilizing motion is sometimes a slap that pins the knife to the body. The inside of the stabilizing fingers will touch the clip on the outside of the pocket when you do this, and the finger tips will act to press the handle. Stabilize low on the knife so it pushes the top end of the knife out slightly from your body. Though this is a small, subtle action it can allow you better access to grip the knife.
Clear / Stabilize / Secure / Draw drills – from right pocket or inside front waistband for right hand
1) Clear Right / Stabilize Right / Secure Right /
Draw
2) Clear Right / Stabilize Left / Secure Right / Draw
3) Clear Left / Stabilize Right / Secure Right / Draw
4) Clear Left / Stabilize Right then Left / Secure Right /
Draw
Secure and Draw to a Handle Grip Opening
When carrying a folding knife that clips to your pocket tip up (pin down), you will generally draw by securing your grip on the knife, holding the handle with your thumb and the clip with your fingers. As you draw you will end up holding the knife by the handle. From here, there are several basic openings.
Thumb Push – This is the basic opening intended with most modern knives; you push the thumb stud or the hole to open it. Not a lot needs to be said about this opening - if you own a knife you have done this, and since you are reading Modern Knives I can safely bet more than once. Any weaknesses in this opening lies in that you are pushing in a small circle close to the pivot pin, and thus you have less then optimal leverage to open the blade, but it is still an easy, natural one to use. You want to get used to smoothly opening the knife like this and then stabilizing your grip in whatever manner you prefer. The initial motion of the thumb push is also integral to the following Kinetic and Anchor openings.
Kinetic – The kinetic open is another opening many people are familiar with. You grip the knife by the handle either pin up or pin down (depending on whether you want to open to a forward grip or a reverse grip) and make a quick, snapping ellipse (half-circle) with your wrist and elbow. With practice, this motion alone will snap the blade open and lock it into place. Alternately, you may first use a thumb push to overcome the initial resistance of the lock (about ¼” motion with your thumb so the blade is about 1” open), and then continue with a kinetic opening as described.
Anchor – This is an uncommon opening where you push the spine of the closed folder into the target and slide it forward, opening the blade just slightly (often 1/2” or less) with your thumb, and then reversing your motion to plant the tip of it into the opponent’s clothes or body (like how a barb sets on a fishing hook or spear). From here you open the knife around the anchored point, stabilize your grip, and then either rip out or thrust in. This opening is very useful in both the standing clinch and ground grappling. This is a specialty opening you must work with a dulled folder and a training partner to truly understand. The great advantage of this opening is that it requires little room to do and causes pain immediately, which can cause the opponent to shift position and “open up” for your following strike.
Secure and Draw to a Blade Grip Opening
When carrying a folding knife that clips to your pocket tip down (pin up), you can also draw by securing your grip on the knife, holding the blade with your thumb and the clip with your fingers. As you draw, you will end up holding the knife by the blade, with the pin toward the palm of your hand. From here you may do the Biker Flip opening, or you can simply rotate the knife in your hand and do an opening from the handle grip position. Though it would seem obvious, unless the knife’s blade is high enough profile to pinch as you draw, you can not use this technique, and you’ll again have to rotate the knife and use one of the previous handle grip openings.
Biker Flip – Though you may be imagining a rude hand gesture, this is actually a quick draw technique referred to by some as a “Pinch”, or a “New York” open. It is done by pinching the blade between the thumb and side of the bent first finger. From here the handle is swung at a 45-degree angle down and towards your side. The weight of the handle opens the knife and locks it in place. You can immediately slash from this position where you are half pinching the blade and the handle, or you can stabilize your grip completely on the handle and then attack. Perhaps the simplest and best way to stabilize your grip from here is to place the butt of your knife against your side or chest, with the tip always facing the enemy, and slide the hand down to the final position.
Though many people are skeptical of this opening technique, I learned it in 1984, and in the days when the “Buck Hunter in a belt sheath” was the best carry option going, it was a good one to know. Even today it has a place, and at least one instructor I know considers it the fastest for “draw to cut” that there is. He is so fond of it that he also puts a small rectangle (1/2” x 3/4” or so) of friction tape on the “thumb” side of the blade to make the Biker Flip even easier and more secure to do at speed. Though I don’t think it that any one specific draw is the “best”, this is certainly an important one to learn.
Training Drills for the Quick-Draw
From a natural position with the knife carried in your favorite manner (pocket, waistband, etc.):
1) Solo Drill: Quick draw and employ in closed,
impact striking mode through the angles 1-12
2) Solo Drill: Quick draw, open, and employ through the angles
1-12
3) Focus Mitts: Drill 1 or 2 against a stationary focus mitt: clear,
stabilize, secure, draw, open, employ
4) Focus Mitts: Drill 1 or 2 against charging focus mitt: spin off
the charge, push, draw, open, employ
5) Focus Mitts: Drill 1 or 2 in sparring against focus mitt: use
support hand and foot strikes in with draws
6) Focus Mitts: Drill 1 or 2 against focus mitt and padded stick:
avoid being hit while still hitting mitt
7) Against grabs: Block with your off hand, quick draw, employ in
closed, impact striking mode
8) Against grabs: Block with your off hand, quick draw, open, and
employ
9) Against grabs: Trap the opponent’s arm(s), unarmed kick or
strike, quick draw, open, employ
10) Against grappling: (From Any Top or Bottom position) Stabilize
own position, quick draw, any opening, position reversal and follow
up strikes.
Final Thoughts
In light of all this, let us look back to Bowie’s predicament for a moment. Using what we’ve discussed here, what can be done with knives bereft of any mechanical opening assistance? In these cases, presuming the knife is high profile you can still often use the Kinetic, Anchor, or Biker Flip openings. For the Anchor, you will need to pinch onto the blade with the thumb and first two fingers and push, while stabilizing the handle and pulling with the bottom two fingers, but this is not difficult with some practice. Every knife has a way that it opens best and easiest, just like every knife has a better or worse way to throw, and it is up to us to learn what they are. If the knife has a low profile blade, then you probably need to either use a two-handed opening, or more readily rely on the closed knife as an impact weapon.
And then, there is always biting it open with your
teeth...
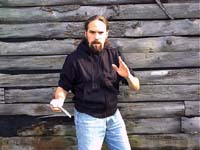
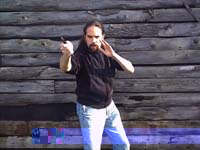
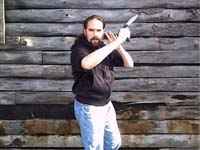
Biker Flip
1) Start from a neutral position.
2) Draw your knife, pinching it by the blade as you clear your pocket
or sheath.
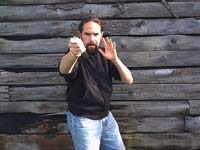
3) Keep it close to the body as you draw, and…
4) Flip the handle back and down, at a 45 degree angle, to lock the
knife open (having to hold the knife so the camera could see it
slightly more vertically downward. It makes the knife very hard
to see when doing this open, which is part of the illusion.
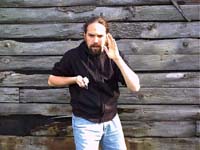
5) Immediately slash with the #1 strike…
6) Retract the pommel to the chest to solidify the grip on the
handle. This is a transitional position, and not just a final
"stance".


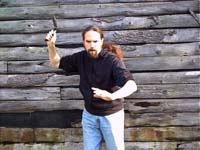
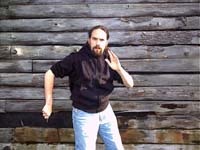
Long-Ark Kinetic #1
1) Start from the neutral position.
2) Draw the knife (this time from back “wallet side”
pocket).
3-4) Swing it up in a short ark, up and to the right to snap the
blade open.
5-6) Slash #1
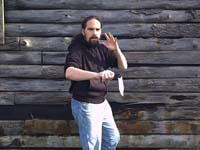
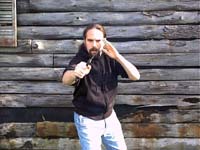
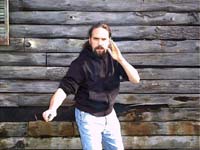
Long-Ark Kinetic #2
1) Start from the neutral position.
2) Draw the knife (this time from back “wallet side”
pocket). In these photos, I'm greatly exaggerating the
motion. You do not want to draw with the arm that wide.
3-4) Swing it up in a short ark, up and to the left to snap the blade
open.
5-6) Slash #2
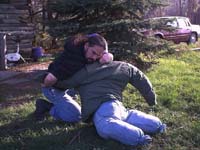
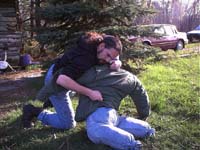
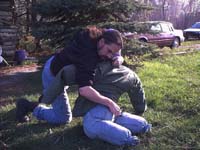
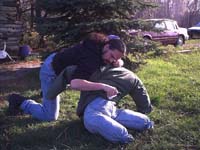


Anchor Opening
1) From a groundfighting tie up, put pressure on him by shifting one
leg back…
2) Draw your knife and press it into him…
3) Slide it forward, keeping contact, and pushing the blade slightly
open
4) Reverse your motion, anchoring the point in his thigh, glutes,
kidney, etc., and…
5) Open the knife for the thrust, twist, cut out, or other
work. I am doing this over top of the jacket in the pictures so
you can see the knife. In training, learn the pros and cons of
getting the knife under outer clothes to defeat them as armor.
6) Let Tigger run in and kick their ass. She'd look at the
camera, but she's keeping him covered in case he tries anything
funny!
I'd also like to mention that due to the limitation of the digital camera I have, I had to still pose these pictures. This fact, combined with the fact that real knife openings happen in a fraction of a second and would actually occur "between the pictures", results in a distortion between how these look and how it would actually look in, say, frames of film from a movie camera where I could just do a quickdraw at speed. These are not exact, but will hopefully give you the idea. The kinetic opening, in particular is hard to show, because there is such a tiny hand motion when it is done correctly.